Mppng Point Labeler - Documentation
Introduction
Mppng Point Labeler is an add-in for Manifold. It helps you to position your labels in order to create better looking maps. Manifold has limited point labeling possibilities. Mppng Point Labeler gives you additional tools to quickly put your labels on the map while minimizing the number of overlaps.
Installation
Mppng Point Labeler requires a valid copy of Manifold 8.0.29 or later. Only the latest version (8.0.29 at the time of this writing) is officially supported.
Download the latest version, create a folder called "Add-ins" in your Manifold config folder and unzip the contents of the zip file here.
Typically your config folder should look like this: <drive letter:><path to manifold config>\Add-ins\PointLabeler.
The folder should contain the following files:
- PointLabeler.dll
- PointFeatureLabeler.dll
- PointLabeler.png
- PointLabeler.xml
The .dll files contain the code for the labeling engine, the .png file holds the icon as shown in Manifold and the latter gives Manifold
information about the add-in so that it can be used properly. In case your directory structure is different from the description above,
the XML-file requires some changes.
Change the two paths to match your situation, e.g.:
<icon>Add-ins\PointLabeler\PointLabeler.png</icon>
<form>Add-ins\PointLabeler\PointFeatureLabeler.dll;Mppng_PointFeatureLabeler.Mppng_Pane</form>
could change to:
<icon>your subdirectory\PointLabeler\PointLabeler.png</icon>
<form>your subdirectory\PointLabeler\PointFeatureLabeler.dll;Mppng_PointFeatureLabeler.Mppng_Pane</form>
If you launch a new instance of Manifold, you'll find the add-in under Tools | Add-Ins. If you click on Mppng Point Labeler you
will see the Mppng Point Labeler's interface.
Usage
Quick start
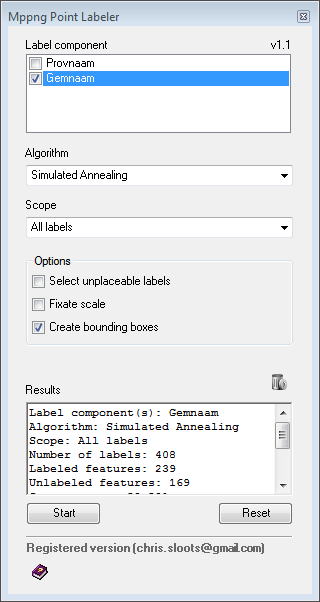
- Choose one or more label components from the first checkbox. These labels will be repositioned by the point labeler.
- Choose an algorithm.
- Set the scope of the operation, either all labels of the chosen label components or just selected labels.
- Set the options.
- Open the label component or a map component that contains the specified label component(s) and zoom to a level of your choice.
- Press start.
- Evaluate the results, if your not satisfied, change zoom level, label size, or try a different algorithm and Press start again.
Ad 1. Mppng Point Labeler is a point labeler. It does not operate on labels that belong to a line element. Therefore only label components that do NOT contain any line element appear in the Label Component dropdownbox. Drawings with polygones are supported because their labels behave as point labels where the centroid plays the role of the point.
Ad 2. Mppng Point Labeler provides 4 algorithms for positioning the labels, and 5 pseudo-algorithms. There is no algorithm that can be qualified as the best. It depends on the dataset. An algorithm that works well in one situation, might perform badly with another dataset. Try different algorithms each time and check which one works best for your specific situation.
- Force Directed Labeling - Uses a continuous placement model, as long as the bounding rectangle of a label touches the point feature it is a valid label position. This is a non-deterministic algorithm. Each time you apply this algorithm the outcome will be different. Initial overlap is used to calculate force vectors to reduce the overlap.
- Simulated Annealing - A stochastic search technique that searches for the optimal solution. To avoid local minima it introduces a probabilistic element in the search process. This is a non-deterministic algorithm. Each time you apply this algorithm the outcome will be different.
- Hirsch Labeling - Uses a continuous placement model, as long as the bounding rectangle of a label touches the point feature it is a valid label position.
- Leftmost Heuristic - A greedy algortihm in that it always places the label whose right edge is leftmost among the right edges of all possible label placements.
- Random Placement - Each label is randomly placed at one of the four basic locations: top left, top right, bottom left or bottom right.
- Resize Labels - This simple algorithm reduces the font size by 10% of each label that overlaps with another label until there are no more conflicts left. This requires per label formatting. Mppng Point Labeler will do this for you if you agree.
- Top Left - Each label is placed to the top left position.
- Top Right - Each label is placed to the top right position.
- Bottom Left - Each label is placed to the bottom left position.
- Bottom Right - Each label is placed to the bottom right position.
Ad 3. Choose wether you want to apply the algorithm to operate on all labels, or to selected labels only.
Ad 4.
- Select unplaceable labels - If checked the labels (and their corresponding objects) that have still some overlap with other labels are selected when the algorithm finishes.
- Fixate scale - If checked the size of the labels will depend on the zoom level. This set the render zoom at the current zoom level.
- Create bounding boxes - If checked a drawing named "Bounding Boxes" will be created. This layer contains a rectangle for each label, describing the extent of the label.
Ad 5. Because the labeling procedure depends on the scale were looking at, it is required to have either the label component we want to modify open as the active document, or a map component that contains the label component. In case we want the algorithm to operate on multiple label components, an opened map component that contains all label components is required.
In some cases the add-in can not figure out that the correct map or label component is already active. In such a case, close and reopen the map or label component.
Ad 6. After pressing "Start" you will be able to interrupt the proces in case it takes too much time.
Ad 7. The results of multiple labeling actions are logged. You can see which label components were involved, which algorithm was used, the scope of the action, the total number of labels involved, the number of labels that were labeled correctly (i.e. without overlap), the number of labels that were not labeled correctly (i.e. with overlap), the success rate (defined as the number of correctly labeled fetures divided by the total number of labels) and the time needed to execute the algorithm (in milliseconds).
To clear the log textbox press the button with the Bin at the top right.
Restrictions demo version
The demo version has the following limitations.
- Only a few labeling algorithms are available
- It is not possible to process selected labels only
- A maximum of 20 objects can be labeled
Pricing
The full version in available for € 89,-. Press the "Buy full version" link at the bottom of the add-in to make a payment by PayPal and you will receive and activation key as soon as possible.
Frequently asked questions
No questions so far. ;-)
Contact
You can contact me here.
© 2012-2025, Mppng